Monster Cookie Peanut Butter Cheesecake Pie: 5 Layers of Joy
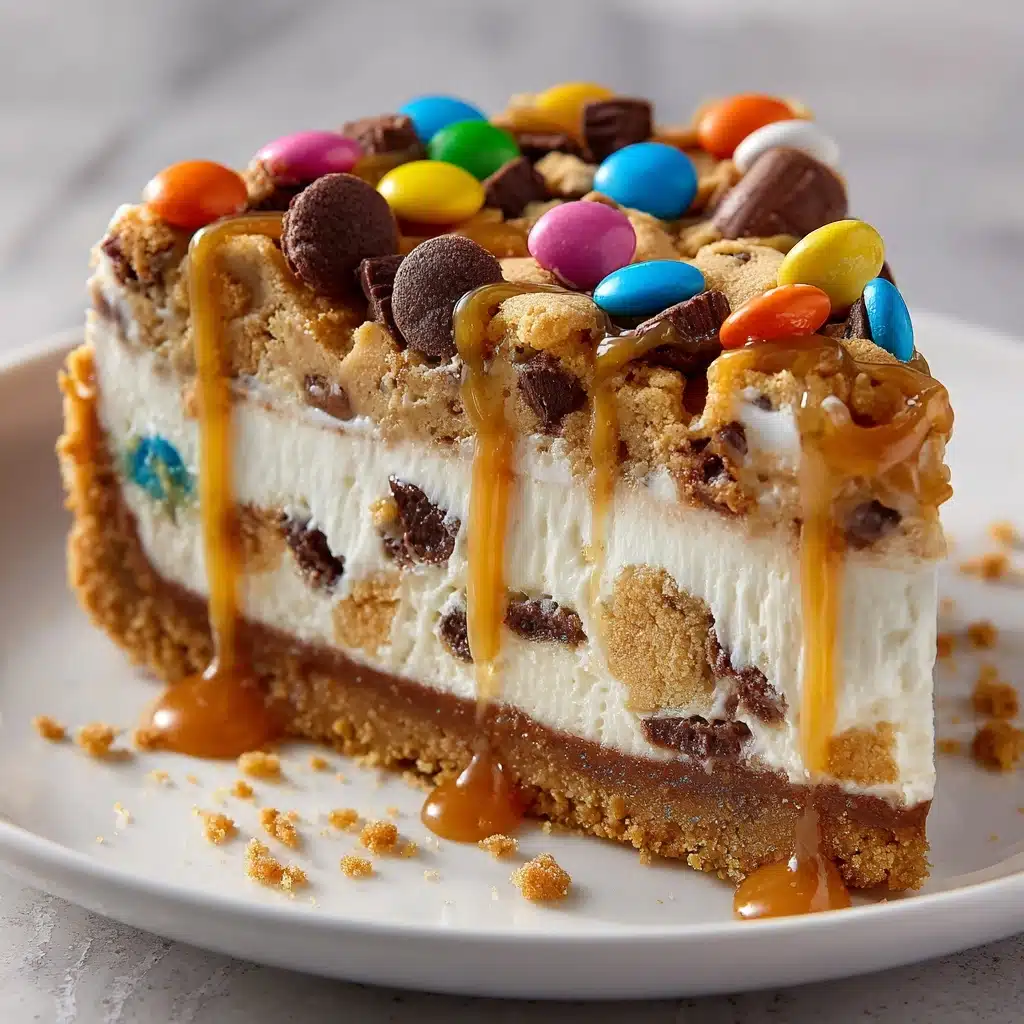
If you’re craving a dessert that truly dazzles with every bite, the Monster Cookie Peanut Butter Cheesecake Pie offers an irresistible treat filled with five distinct textures and flavors. This delightful creation, affectionately known as the Monster Cookie Peanut Butter Cheesecake Pie: 5 Layers of Joy, brings together creamy peanut butter cheesecake, crunchy monster cookies, and colorful candy toppings in a way that’s simply unforgettable. Whether you’re serving it for a celebration or a cozy night in, this pie promises to light up your taste buds and bring smiles all around.

Ingredients You’ll Need
Gathering the right ingredients is the first step toward baking your own slice of heaven. Each element in this recipe plays an essential role, from creating the perfect creamy base to adding that sweet, crunchy finish that makes the Monster Cookie Peanut Butter Cheesecake Pie: 5 Layers of Joy truly stand out.
- Pie crust: A buttery, flaky foundation that holds all the delicious layers together perfectly.
- Monster cookies, crushed (2 cups): These bring a unique mix of oats, chocolate chips, and peanut butter flavors, adding fantastic crunch and depth.
- Cream cheese (8 oz, softened): Provides the rich, creamy tang that balances the sweetness beautifully.
- Peanut butter (1 cup): Adds warmth and a nutty flavor that’s at the heart of the pie’s identity.
- Powdered sugar (1 cup): Sweetens the cheesecake layer smoothly without any grittiness.
- Whipped cream (1 cup): Lightens the texture, making the cheesecake layer fluffy and airy.
- Chocolate chips (1/2 cup): Sprinkle on top for bursts of melty chocolate pleasure.
- Mini M&Ms (1/2 cup): Add vibrant color and candy crunch to finish the look and taste of the pie.
How to Make Monster Cookie Peanut Butter Cheesecake Pie: 5 Layers of Joy
Step 1: Preheat and Prep
Start by setting your oven to 350°F. This ensures it’s perfectly heated for baking your masterpiece once it’s assembled. Prepare your pie crust by placing it snugly into a pie dish, ready to cradle all those wonderfully rich layers.
Step 2: Mix the Cream Cheese Filling
In a mixing bowl, combine the softened cream cheese with peanut butter and powdered sugar. Stir vigorously until your mixture is silky smooth without any lumps, creating that luscious peanut butter cheesecake base that’s the first layer of your Monster Cookie Peanut Butter Cheesecake Pie: 5 Layers of Joy.
Step 3: Fold in the Whipped Cream
Gently fold the whipped cream into your cream cheese mixture. This step is key to achieving the pie’s signature lightness and fluffy texture, making each bite feel like a cloud of flavor.
Step 4: Assemble the Pie
Spread your creamy filling evenly over the prepared pie crust. This sets up the foundation before you build the exciting layers on top that give this dessert its name.
Step 5: Add the Crunch and Color
Sprinkle a generous layer of crushed monster cookies over the top, then follow with chocolate chips and mini M&Ms. These toppings add texture, sweetness, and that colorful, playful look that makes the Monster Cookie Peanut Butter Cheesecake Pie: 5 Layers of Joy so irresistible.
Step 6: Bake Until Set
Place your pie in the oven and bake for about 25 minutes, or until the filling is set. This baking step helps the flavors meld together beautifully while maintaining the distinct layers.
Step 7: Cool and Celebrate
Allow the pie to cool completely before serving. This pause is essential for the layers to firm up, turning your work into a slice of dessert heaven.
How to Serve Monster Cookie Peanut Butter Cheesecake Pie: 5 Layers of Joy
Garnishes
Elevate your presentation with a few extra crushed monster cookies or a drizzle of melted peanut butter on top. Fresh whipped cream dollops or a sprinkle of chopped nuts can also add an inviting finish that makes every slice look as good as it tastes.
Side Dishes
Serve the Monster Cookie Peanut Butter Cheesecake Pie: 5 Layers of Joy alongside a scoop of vanilla ice cream or fresh berries for a balance of creamy and fruity contrasts. A light, refreshing mint tea or a cold glass of milk pairs wonderfully, rounding out this joyful dessert experience.
Creative Ways to Present
Consider serving this pie in individual mini tart pans for personal servings that wow guests. You could also layer it in clear dessert glasses to showcase the stunning layers or add edible gold leaf for an extra touch of elegance when entertaining.
Make Ahead and Storage
Storing Leftovers
Once cooled, cover your pie tightly with plastic wrap or store it in an airtight container in the refrigerator. The Monster Cookie Peanut Butter Cheesecake Pie: 5 Layers of Joy stays fresh for up to 4 days, making it perfect for enjoying over multiple dessert occasions.
Freezing
If you want to save some for later, freezing is a great option. Wrap the pie securely with both plastic wrap and aluminum foil before freezing. It will hold its flavor and texture well for up to 2 months.
Reheating
For the best taste, thaw frozen pie overnight in the fridge. Since this dessert is best served chilled, avoid reheating as it could affect the creamy layers. Simply slice and serve cold or at room temperature.
FAQs
Can I use store-bought cookie crumbs instead of monster cookies?
While store-bought cookie crumbs can work, monster cookies offer a unique combination of oats, peanut butter, and chocolate that brings the Monster Cookie Peanut Butter Cheesecake Pie: 5 Layers of Joy to life. Using them gives the pie its signature crunch and flavor.
Is it possible to make this pie nut-free?
This recipe is heavily peanut butter-based, which is central to its flavor. However, you could experiment by replacing peanut butter with sunflower seed butter and choosing allergen-friendly cookies, but the taste will differ from the classic Monster Cookie Peanut Butter Cheesecake Pie: 5 Layers of Joy.
Can I prepare this pie the day before serving?
Absolutely! In fact, making the Monster Cookie Peanut Butter Cheesecake Pie: 5 Layers of Joy ahead allows the flavors to meld and the filling to set nicely. Just keep it refrigerated and bring it out about 30 minutes before serving for the best texture.
What can I substitute for the whipped cream?
If you don’t have whipped cream, you can try folding in whipped coconut cream for a dairy-free option. Just keep in mind it might slightly change the flavor and texture but will still keep the light, fluffy layer.
How do I prevent the pie crust from getting soggy?
To keep the crust crisp, consider pre-baking (blind baking) it for about 10 minutes before adding the filling. This step helps form a barrier, keeping your pie sturdy and delicious as part of the Monster Cookie Peanut Butter Cheesecake Pie: 5 Layers of Joy.
Final Thoughts
There is something truly magical about the Monster Cookie Peanut Butter Cheesecake Pie: 5 Layers of Joy in this Monster Cookie Peanut Butter Cheesecake Pie, a dessert that feels like a celebration in every slice. With its perfect combination of creamy, crunchy, sweet, and colorful textures, it’s a treat that’s sure to become a favorite in your dessert repertoire. So go ahead, try this recipe and share the joy—you won’t regret it!
PrintMonster Cookie Peanut Butter Cheesecake Pie: 5 Layers of Joy

A decadent and fun Monster Cookie Peanut Butter Cheesecake Pie boasting five layers of indulgent flavors and textures, featuring a creamy peanut butter cheesecake filling topped with crushed monster cookies, chocolate chips, and mini M&Ms—all baked into a buttery pie crust for a delightful treat.
- Prep Time: 15 minutes
- Cook Time: 25 minutes
- Total Time: 40 minutes
- Yield: 8 servings 1x
- Category: Dessert
- Method: Baking
- Cuisine: American
- Diet: Vegetarian
Ingredients
Pie Base
- 1 pie crust
Cheesecake Filling
- 8 oz cream cheese, softened
- 1 cup peanut butter
- 1 cup powdered sugar
- 1 cup whipped cream
Topping
- 2 cups monster cookies, crushed
- 1/2 cup chocolate chips
- 1/2 cup mini M&Ms
Instructions
- Preheat Oven: Preheat your oven to 350°F (175°C) to prepare for baking the pie.
- Prepare Pie Crust: Place the pie crust into a pie dish, ensuring it fits evenly and pressing down gently on the bottom and sides.
- Mix Filling: In a medium bowl, combine the softened cream cheese, peanut butter, and powdered sugar. Beat until the mixture is smooth and creamy.
- Fold in Whipped Cream: Carefully fold the whipped cream into the peanut butter mixture to maintain a light and fluffy texture.
- Assemble Filling: Spread the creamy peanut butter cheesecake mixture evenly into the prepared pie crust.
- Add Toppings: Sprinkle the crushed monster cookies evenly over the top of the filling, then add the chocolate chips and mini M&Ms to create a colorful, crunchy layer.
- Bake: Bake the assembled pie in the preheated oven for 25 minutes or until the filling is set and the edges are lightly golden.
- Cool and Serve: Allow the pie to cool completely before slicing and serving to ensure clean slices and optimal flavor.
Notes
- For best results, use room temperature cream cheese to ensure a smooth filling.
- Allow the pie to cool fully before slicing to avoid a runny filling.
- Monster cookies typically contain oats, chocolate chips, M&Ms, and peanut butter, adding texture and flavor.
- Store leftovers covered in the refrigerator for up to 3 days.
- For a gluten-free option, substitute the pie crust and monster cookies with gluten-free versions.
Nutrition
- Serving Size: 1 slice (1/8th of pie)
- Calories: 420 kcal
- Sugar: 28 g
- Sodium: 200 mg
- Fat: 28 g
- Saturated Fat: 10 g
- Unsaturated Fat: 15 g
- Trans Fat: 0 g
- Carbohydrates: 37 g
- Fiber: 2 g
- Protein: 8 g
- Cholesterol: 45 mg
Keywords: monster cookie pie, peanut butter cheesecake, layered dessert, baked cheesecake pie, chocolate chip dessert, colorful pie, kid-friendly dessert


