Gluten Free Fruit Tarts Recipe
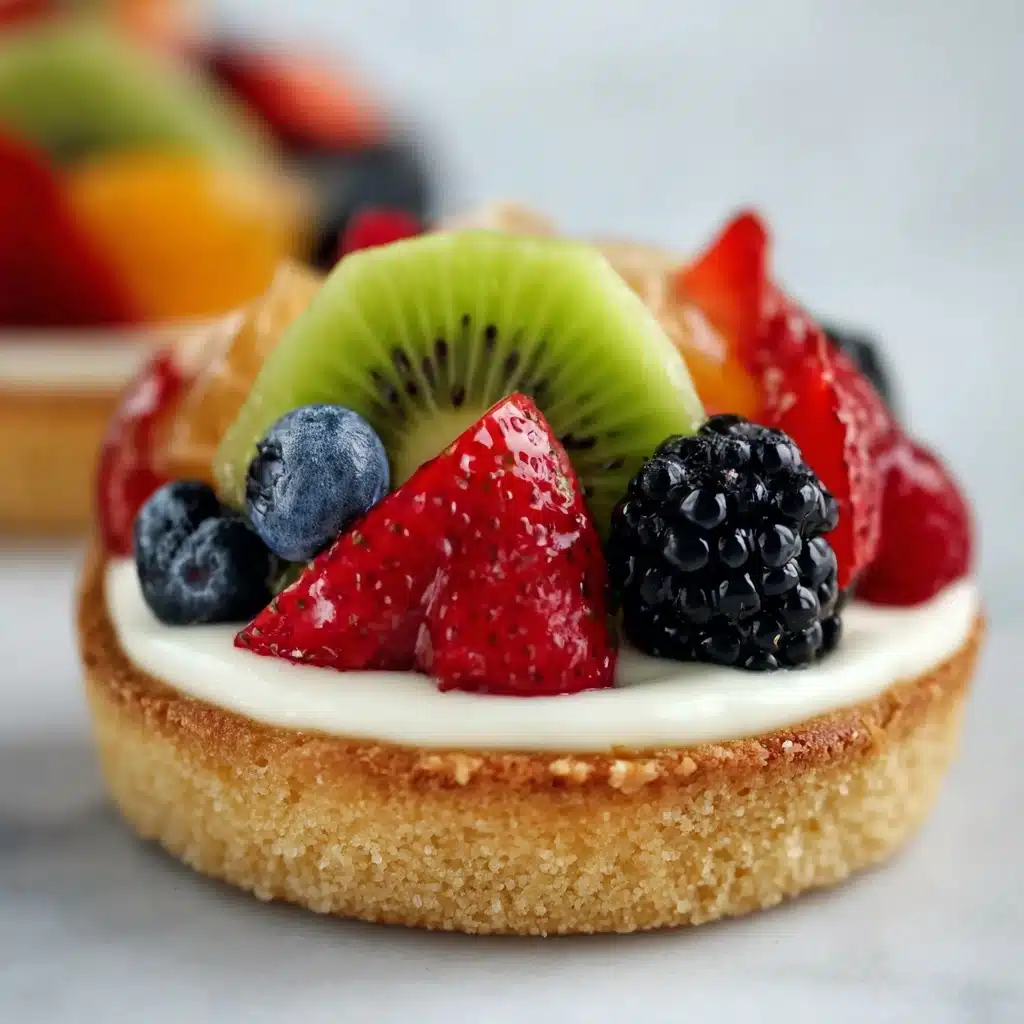
If you’ve ever dreamed of a dessert that’s as beautiful as it is delicious, then these Gluten Free Fruit Tarts are going to steal your heart and your taste buds. Imagine crisp, buttery tart shells that perfectly cradle a rich, silky pastry cream, topped with a vibrant rainbow of fresh fruits—all finished with a glossy, delicate glaze that makes every bite feel like a celebration. Whether you’re gluten intolerant or simply looking for a stunning treat to impress friends and family, these tarts deliver flavor, texture, and eye-catching appeal in every single slice.
Ingredients You’ll Need
Even though Gluten Free Fruit Tarts might look fancy, the ingredients are wonderfully straightforward. Each one plays a vital role: the gluten free flour blend and almond flour create a tender crust, butter adds richness, eggs bring everything together, and fresh fruits provide a pop of color and vibrant flavor. The kitchen pantry probably already has most of what you need to create this masterpiece.
- Kim’s all purpose gluten free flour blend (1½ cups/210g): The backbone of the tart shell, providing structure without gluten’s elasticity.
- Powdered sugar (¾ cup/94g): Adds subtle sweetness and tenderness to the crust.
- Almond flour (30g): Boosts moisture and gives a natural, nutty aroma to the pastry.
- Butter, cold and cut into chunks (½ cup/113g): Essential for that flaky, buttery texture in your tart shells.
- One large cold egg: Acts as a binder, helping the dough come together smoothly.
- Whole milk (1 cup/240ml): Combines with cream to make the luxe custard filling.
- Heavy cream (1 cup/240ml): Adds richness and smoothness to the pastry cream.
- Six large egg yolks, room temperature: Give the pastry cream that silky thickness and vibrant color.
- Granulated sugar (½ cup/100g): Sweetens the custard and the glaze with just the right balance.
- Cornstarch (¼ cup/30g): Acts as a thickener for the pastry cream, ensuring perfect consistency.
- Butter at room temperature (2 tbsp/28g): Stirred into the pastry cream for added silkiness.
- Vanilla extract or vanilla bean paste (1 tbsp): Infuses the pastry cream with warm, comforting flavor.
- Granulated sugar for glaze (2 tbsp/25g): Sweetens and stabilizes the clear fruit tart glaze.
- Potato starch (1 tbsp/12g): Key ingredient for the glossy glaze, ensuring it sets perfectly.
- Water (1 cup/240ml): Used in glazing the fruit for that beautiful shine.
- Pinch of cinnamon (optional): Adds a subtle layer of warmth to the glaze, if you fancy.
- Fresh fruit of choice: Strawberries, blueberries, raspberries, kiwi, mango—you decide! The fresh fruit tops your tarts with bursts of color and flavor.
How to Make Gluten Free Fruit Tarts
Step 1: Prepare the Tart Shells
Begin by whisking together your gluten free flour blend, powdered sugar, and almond flour to create a balanced dry base. Next, rub in the cold butter chunks with your hands until the mixture resembles sandy crumbs—this is the secret to a light, flaky crust. Add the cold egg and mix just until the dough forms a smooth ball. If it feels too warm, pop it in the fridge for a bit. Rolling out the dough between silicone mats keeps things clean and easy, and chilling it in the freezer ensures the tarts hold their shape beautifully when baking. Cut your circles and strips to assemble the shells, freeze again briefly, and bake low and slow until golden. Your tart shells will come out crisp, tender, and ready to cradle that luscious filling.
Step 2: Make the Pastry Cream
The pastry cream is the luscious heart of these Gluten Free Fruit Tarts. Warm the milk and cream together until just bubbling, then temper the egg yolks mixed with sugar and cornstarch by slowly whisking in the hot liquid—this keeps the eggs from scrambling. Return it all to the saucepan and whisk vigorously over medium heat until thick and dreamy. Strain it to eliminate any clumps, then stir in butter and vanilla for a silky finish. Chill it well so the cream sets to a perfect spreadable texture that holds your fruit effortlessly.
Step 3: Prepare the Clear Glaze
A lovely clear glaze seals in the fresh fruits and gives each tart that professional sheen. Mix potato starch with a bit of water, then combine with more water and sugar in a saucepan. Heat gently and stir until thickened—if you like, add a pinch of cinnamon to give the glaze a subtle warmth. Let the glaze cool, but keep it smooth by stirring occasionally. This will ensure your fruit looks shiny without the gooey mess.
Step 4: Assemble Your Gluten Free Fruit Tarts
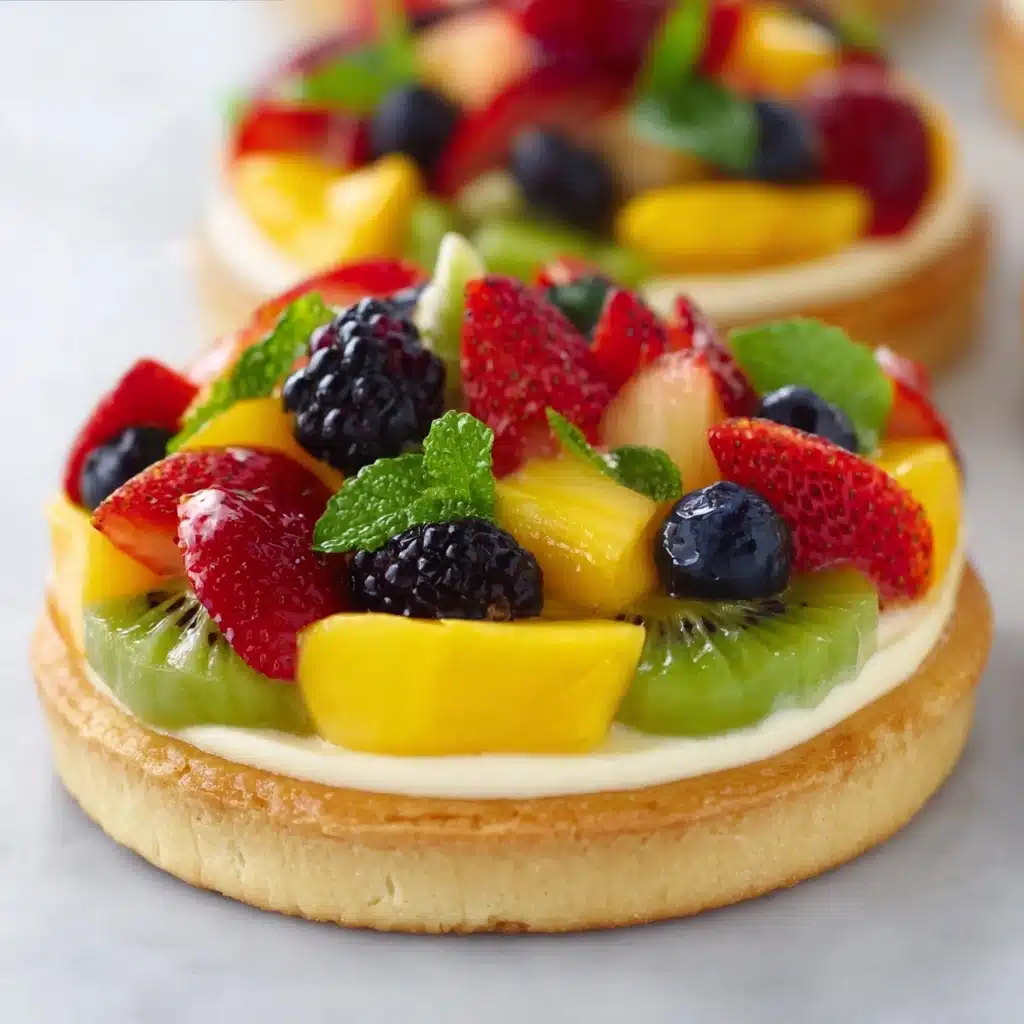
Fill your cooled tart shells generously with the chilled pastry cream, smoothing it out carefully. Now comes the fun part—arranging your fresh fruit. Go for vibrant contrasts and playful patterns, layering berries, kiwi slices, or mango chunks however your creativity leads. Finally, brush the clear glaze over the top to beautifully lock in moisture and give your tarts a glassy finish. Chill or serve immediately for a fresh, eye-catching dessert everyone will adore.
How to Serve Gluten Free Fruit Tarts
Garnishes
A sprinkle of finely chopped mint leaves or edible flowers can elevate these tarts from beautiful to breathtaking. Lightly dusting with powdered sugar right before serving adds charm without overpowering the fresh fruit’s natural sweetness. For a bit of texture, a few toasted almond slivers scattered around the plate add a lovely crunch and nutty aroma.
Side Dishes
Pair these Gluten Free Fruit Tarts with a scoop of homemade vanilla bean ice cream or a dollop of whipped cream for an extra indulgent treat. Light, refreshing beverages like sparkling water with lemon or a chilled herbal tea complement the tarts without competing with their delicate flavors. For brunch occasions, a fresh fruit salad alongside adds layers of freshness and variety.
Creative Ways to Present
Want to impress guests? Serve individual tarts on delicate dessert plates, each decorated with a drizzle of berry coulis or a small pool of honey. Alternatively, tuck mini tarts into pretty cupcake liners or decorative paper cups to make them easy to grab and eat. For a larger gathering, create a tart platter with a rainbow of fruits artfully arranged for a stunning centerpiece everyone can admire before diving in.
Make Ahead and Storage
Storing Leftovers
You can keep fully assembled Gluten Free Fruit Tarts in the refrigerator for up to two days, though the crust may soften slightly over time. For best texture, store the tart shells and filling separately and assemble just before serving. Always cover tarts with plastic wrap or keep them in an airtight container to maintain freshness and prevent the fruit from drying out.
Freezing
While the tart shells freeze well before baking, once filled and glazed, freezing is not recommended as it affects the fruit texture and pastry cream quality. Freeze the unbaked tart shells for up to one month and bake directly from frozen, adding a few extra minutes to the baking time. Keep your glaze and fresh fruit toppings refrigerated separately until the last moment for best results.
Reheating
Since these tarts feature fresh fruit and pastry cream, reheating is best avoided. If needed, allow refrigerated tart shells to come to room temperature before adding filling. For a warm crust experience, reheat unfilled tart shells gently in a low oven for 3-5 minutes and let cool before assembling.
FAQs
Can I use a different gluten free flour blend?
Yes, but results may vary. The recipe was tested with Kim’s all purpose gluten free flour blend, which provides optimal texture. If using another blend, look for one with similar starch and protein content for the best crust consistency.
What fruits work best on these tarts?
Fruits that hold up well and offer a variety of colors and textures are ideal. Think strawberries, blueberries, raspberries, kiwi, and mango. Avoid overly juicy fruits like watermelon, which can make the crust soggy quickly.
Can I make the tart shells in advance?
Absolutely! You can prepare and bake the tart shells a day or two before assembling. Store them in an airtight container at room temperature to keep them crisp until you’re ready to fill and decorate.
Is it possible to make the pastry cream dairy-free?
Yes, by substituting plant-based milks and creams with full-fat options like coconut milk or oat cream, you can create a dairy-free pastry cream. Keep in mind flavor and texture might differ slightly.
How do I prevent the glaze from forming a skin while cooling?
Simply stir or whisk the glaze every few minutes as it cools to keep it smooth and prevent a skin from developing, ensuring a perfectly glossy finish for your fruit tarts.
Final Thoughts
If you’re craving a show-stopping dessert that feels both elegant and comforting, these Gluten Free Fruit Tarts are your new best friend in the kitchen. The combination of crisp, buttery crusts, creamy custard, and fresh, vibrant fruits, all wrapped up in a shiny glaze, strikes the perfect balance between indulgence and freshness. Give this recipe a try—you’ll find it’s just as joyful to make as it is to eat, and trust me, everyone will be asking for seconds!
PrintGluten Free Fruit Tarts Recipe

Delight in these elegant Gluten Free Fruit Tarts featuring a buttery, crumbly shell made from a gluten free flour blend and almond flour, filled with silky homemade vanilla pastry cream, topped with a vibrant assortment of fresh fruits and a glossy clear glaze. Perfect for special occasions or any time you want a beautiful, naturally gluten free dessert.
- Prep Time: 40 minutes
- Cook Time: 30 minutes
- Total Time: 3 hours 10 minutes (including chilling and freezing times)
- Yield: 8 individual fruit tarts 1x
- Category: Dessert
- Method: Baking
- Cuisine: Gluten Free, Western
- Diet: Gluten Free
Ingredients
Tart Shell
- 1½ cups (210g) Kim’s all purpose gluten free flour blend (or tested store-bought blend)
- ¾ cup (94g) powdered sugar
- 30g almond flour
- ½ cup (113g) cold butter, cut into chunks
- 1 large cold egg
Pastry Cream
- 1 cup (240ml) whole milk
- 1 cup (240ml) heavy cream
- 6 large egg yolks, at room temperature
- ½ cup (100g) granulated sugar
- ¼ cup (30g) cornstarch
- 2 tbsp (28g) butter, at room temperature
- 1 tbsp vanilla extract or vanilla bean paste
Clear Glaze
- 1 tbsp (12g) potato starch
- 1 cup (240ml) water (divided into ¼ cup and ¾ cup)
- 2 tbsp (25g) granulated sugar
- Pinch of cinnamon (optional)
Garnish
- Fresh fruit of choice (strawberries, blueberries, raspberries, kiwi, mango, etc.)
Instructions
- Prepare Tart Shells: In a medium bowl, whisk together the gluten free flour blend, powdered sugar, and almond flour. Add cold butter chunks and rub into the dry ingredients with your hands until it resembles coarse sand. Add the cold egg and mix with your hands or fork until a dough forms. Knead on countertop with the palm of your hand until smooth. Chill dough in plastic wrap if too warm, for 15-20 minutes.
- Roll and Chill Dough: Roll dough between two silicone mats or parchment paper to ⅛ to ¼ inch thick. Transfer dough on mats to a baking sheet and freeze for 15 minutes.
- Cut and Assemble Tart Shells: Line two baking sheets with perforated air mats or parchment paper. Remove dough from freezer and cut 8 bottom circles with tart ring. Use offset spatula to move them into tart rings on perforated mats. Cut 8 long strips from remaining dough and press into sides of tart rings to form walls. Freeze assembled tart shells for 30 minutes. Preheat oven to 320° F (160° C).
- Bake Tart Shells: Remove tart shells from freezer. Trim tops with sharp knife for even edges. Bake for 20 minutes, then carefully remove rings and bake another 5 minutes or until golden brown. Let cool completely on mats before filling.
- Make Pastry Cream: Heat milk and heavy cream in saucepan over medium heat until just below boiling and bubbles form around edges. Meanwhile, whisk cornstarch and sugar in a bowl, add egg yolks and whisk until thick and smooth. Slowly temper eggs by whisking in warm milk mixture. Return mixture to saucepan and cook over medium heat, whisking constantly until thickened and bubbling. Whisk vigorously for 1 minute. Remove from heat and strain through a sieve into a bowl. Stir in butter and vanilla until smooth. Cover with plastic wrap directly on the surface and chill at least 2 hours.
- Prepare Clear Glaze: In a small bowl, whisk together potato starch and ¼ cup (60ml) water until smooth. In a small saucepan, combine remaining ¾ cup (180ml) water, potato starch mixture, and sugar. Heat over medium heat, stirring constantly until thickened. Optionally add a pinch of cinnamon. Remove from heat and cool, stirring occasionally to prevent skin formation.
- Assemble Tarts: Spoon chilled pastry cream into cooled tart shells, spreading evenly with offset spatula. Arrange fresh fruit artfully over the cream. Using a pastry brush, gently coat the fruit with the cooled glaze to add shine and preserve freshness. Serve immediately or refrigerate up to 1-2 days. Note: crusts will soften in the fridge over time.
Notes
- Use very cold butter and egg to ensure a tender, flaky tart shell.
- Keep dough chilled and handle quickly to prevent softening while forming tart shells.
- Freezing tart shells multiple times helps maintain shape and texture during baking.
- If pastry cream develops skin while chilling, whisk again before filling.
- The clear glaze can be flavored with cinnamon or omitted for a neutral finish.
- Chosen fruits should be fresh, ripe, and dry for best presentation and to avoid soggy crusts.
Nutrition
- Serving Size: 1 tart
- Calories: 340 kcal
- Sugar: 25 g
- Sodium: 90 mg
- Fat: 20 g
- Saturated Fat: 12 g
- Unsaturated Fat: 7 g
- Trans Fat: 0 g
- Carbohydrates: 32 g
- Fiber: 2 g
- Protein: 5 g
- Cholesterol: 140 mg
Keywords: gluten free fruit tarts, gluten free dessert, fruit tart recipe, gluten free pastry cream tart, gluten free baking
