How to Dry Oranges in the Oven: A Step-by-Step Guide Recipe
Introduction
Dried oranges make a beautiful, flavorful addition to snacks, decorations, and recipes. This simple oven-drying method transforms fresh orange slices into chewy, aromatic treats perfect for garnishes or homemade potpourri.

Ingredients
- Fresh oranges (ripe but firm, quantity as desired)
Instructions
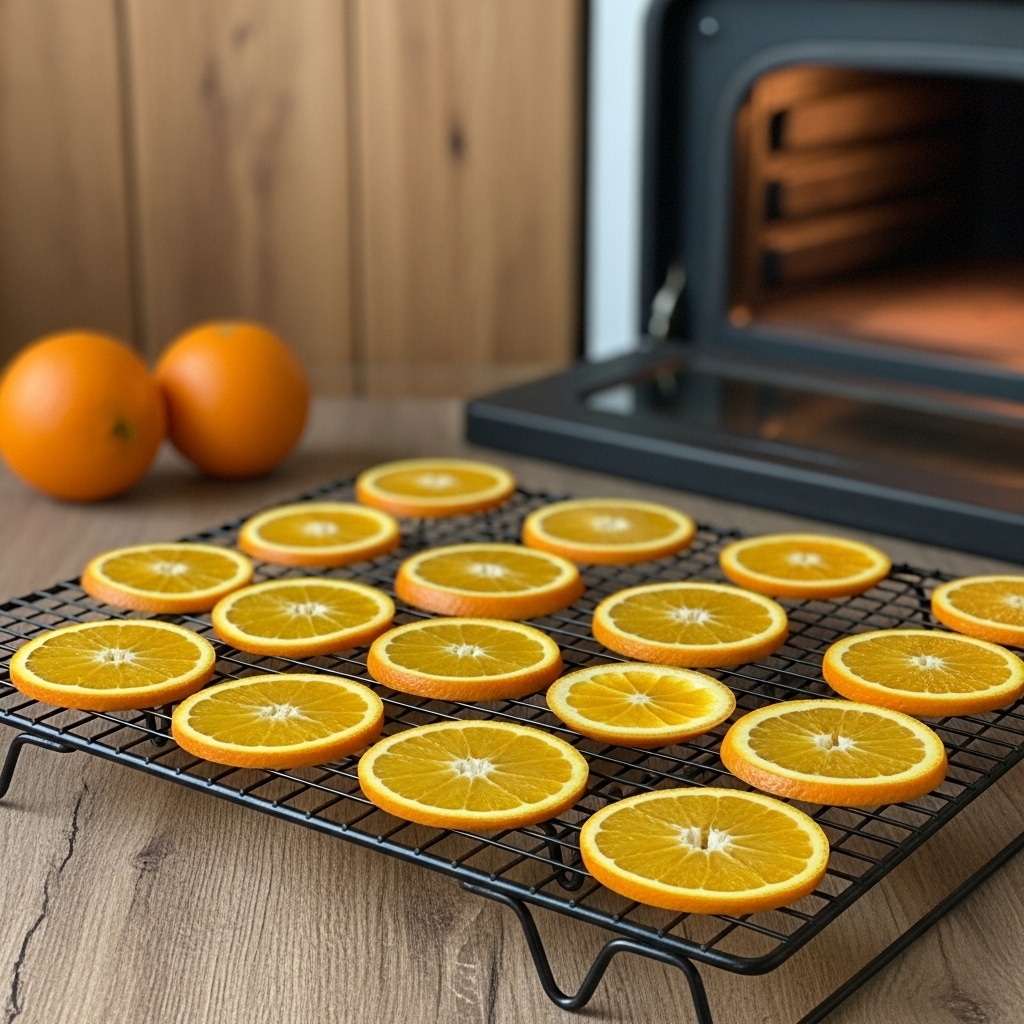
- Step 1: Preheat your oven to its lowest setting, ideally between 150-200°F (65-95°C). While the oven warms up, slice the oranges into rounds about 1/4 inch thick using a sharp knife or mandoline slicer for even thickness.
- Step 2: Pat the orange slices dry with a paper towel to remove excess moisture. Line a baking sheet with parchment paper and arrange the slices in a single layer without overlapping.
- Step 3: Place the baking sheet in the oven and dry the orange slices for 2 to 3 hours. Flip the slices halfway through the drying process to help them dry evenly and keep a flat shape.
- Step 4: Monitor the slices closely during the last hour to avoid browning. The oranges are ready when they feel firm and leathery but not sticky or moist.
- Step 5: Remove the dried orange slices from the oven and let them cool completely before storing.
Tips & Variations
- For even drying, ensure slices are uniform in thickness and avoid overcrowding the baking sheet.
- If you prefer a sweeter flavor, sprinkle a little cinnamon or sugar on the slices before drying.
- Use different citrus fruits like lemons or limes for variety.
Storage
Store cooled dried orange slices in an airtight container in a cool, dry place. They will keep fresh and flavorful for several weeks. If they become too dry or brittle, avoid exposure to humidity. To refresh slightly, warm them briefly in a low oven.
How to Serve
Serve this delicious recipe with your favorite sides.
FAQs
Can I use other citrus fruits instead of oranges?
Yes, lemons, limes, and grapefruits can also be dried using this oven method with similar results.
How can I tell when the oranges are fully dried?
Fully dried orange slices should feel firm and leathery without any sticky or moist spots. They may still be slightly pliable but should not be soft.
PrintHow to Dry Oranges in the Oven: A Step-by-Step Guide Recipe

Learn how to dry fresh oranges in the oven with this straightforward step-by-step guide. Using the oven drying method at low temperatures, you can create beautifully dried orange slices that are perfect for garnishes, crafts, or snacking. This method ensures the oranges dry evenly to a firm, leathery texture without browning or sticking.
- Prep Time: 15 minutes
- Cook Time: 2.5 hours
- Total Time: 2 hours 45 minutes
- Yield: Approximately 20-30 dried orange slices per medium orange; varies by orange size and slice thickness
- Category: Snack
- Method: Baking
- Cuisine: Universal
- Diet: Vegan
Ingredients
Ingredients
- Fresh Oranges – quantity depends on desired yield; choose ripe, firm oranges with no signs of spoilage
Instructions
- Preheat and Prepare: Preheat your oven to the lowest setting, between 150-200°F (65-95°C). While the oven heats, slice the oranges into approximately 1/4-inch thick rounds using a sharp knife or mandoline for uniform thickness. Line a baking sheet with parchment paper to prevent sticking and simplify cleanup.
- Pat Dry: Before placing the slices on the baking sheet, gently pat them dry with a paper towel to remove excess moisture. This helps the slices dry evenly and reduces sticking during baking.
- Arrange and Bake: Lay the orange slices in a single layer on the parchment-lined baking sheet, making sure slices do not overlap. Place the sheet in the preheated oven and dry the slices for 2 to 3 hours, flipping them halfway through the drying time to ensure even drying and help maintain a flat shape.
- Monitor and Cool: During the final hour, keep a close eye on the slices to avoid browning. The dried oranges should feel firm and leathery without any visible moisture. Once dried, remove from the oven and allow the slices to cool completely on the baking sheet.
- Store: Store your cooled dried orange slices in an airtight container placed in a cool, dry location. Proper storage preserves their freshness, color, and texture for future use in garnishes, recipes, or decorations.
Notes
- Use a mandoline or sharp knife to ensure evenly thick slices for uniform drying.
- Adjust drying time slightly depending on the thickness of slices and your oven’s lowest temperature.
- Patting the slices dry before baking reduces the risk of sticking and speeds the drying process.
- Check frequently during the last hour to prevent over-drying or browning.
- Dried oranges can be used for decoration, in teas, as a fragrant garnish, or in potpourri.
Keywords: dried oranges, dried fruit, oven dried oranges, orange slices, how to dry oranges, fruit drying, dried citrus, homemade dried fruit


