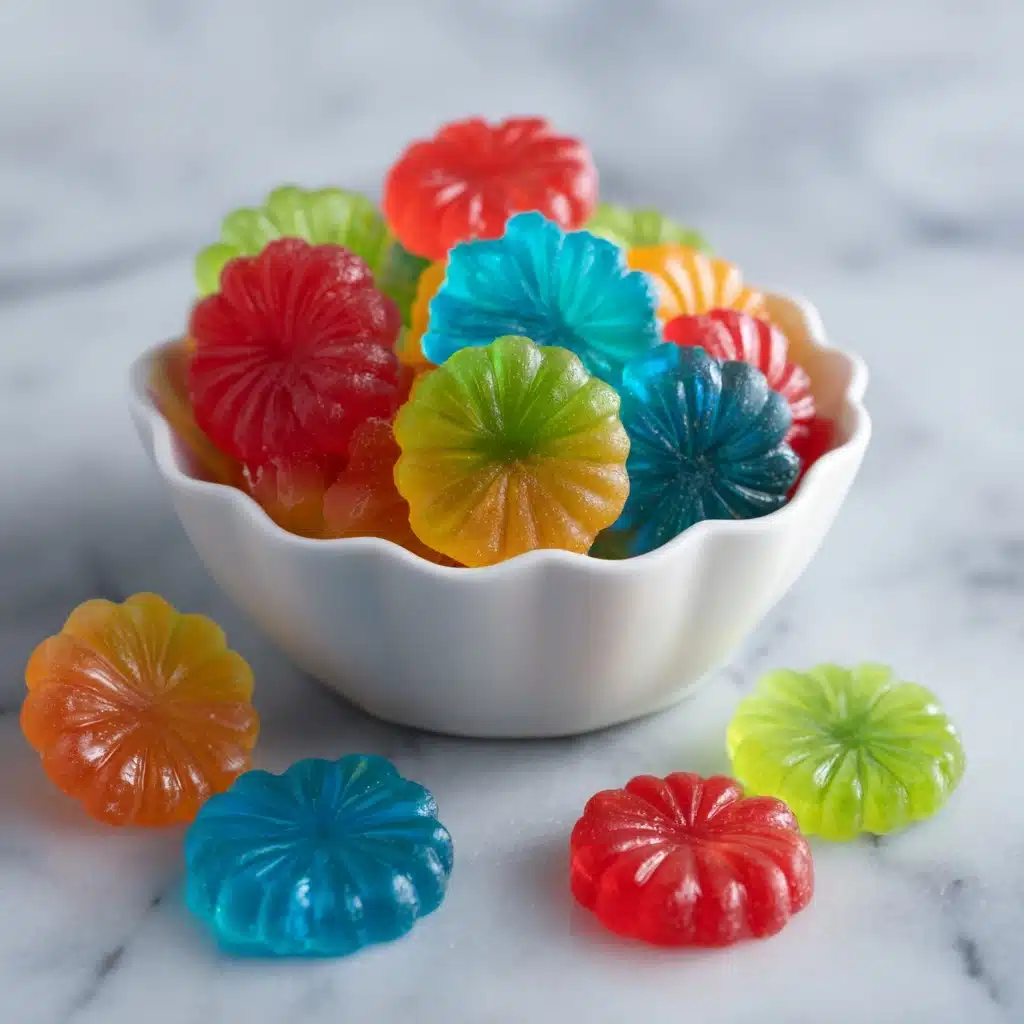
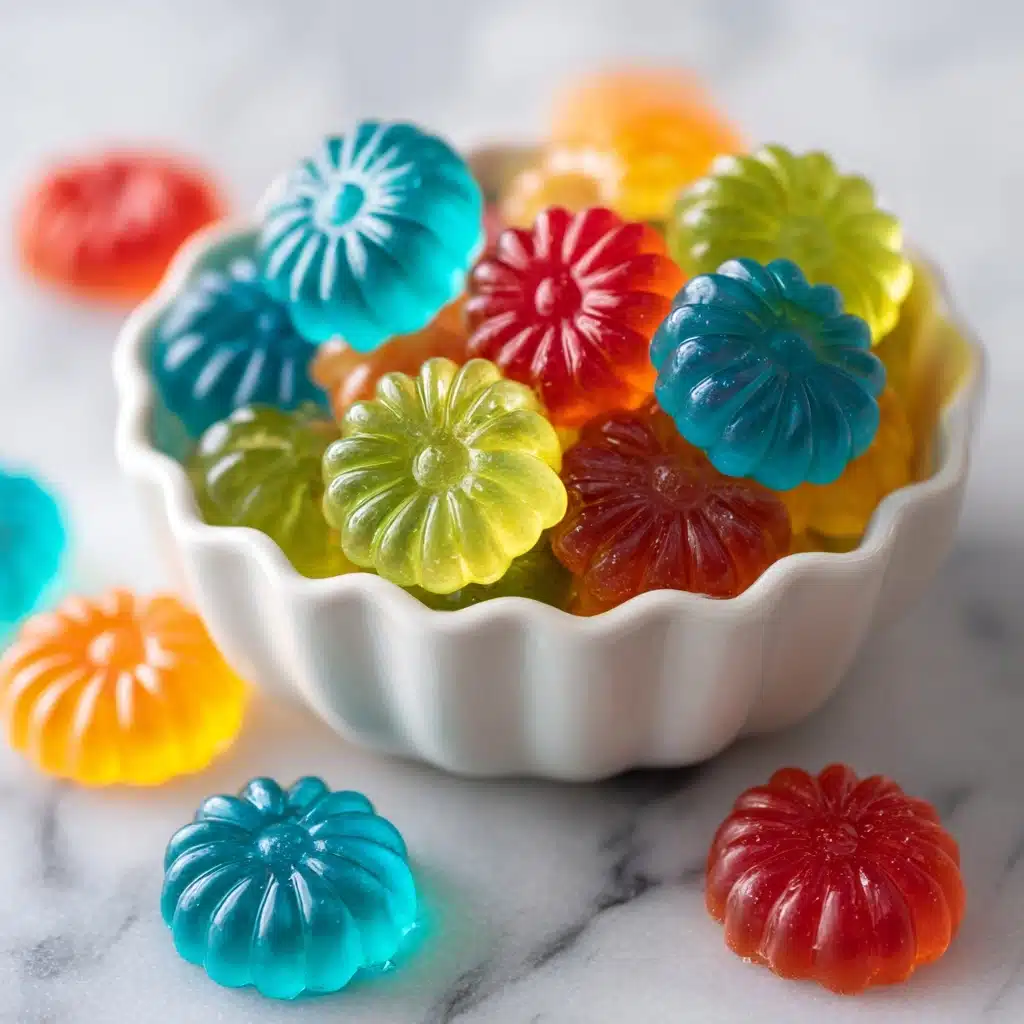
Jello Candy Melts: Sweet Treats Made Easy Recipe
If you love vibrant, fruity sweets that melt in your mouth, then you are in for a real treat with Jello Candy Melts: Sweet Treats Made Easy. These homemade candies capture the tart and sweet flavors of flavored gelatin combined with a perfectly chewy, melt-away texture that feels like a magic trick in your kitchen. Whether you want to impress guests, make a fun project with kids, or just treat yourself, this recipe brings the joy of colorful, handcrafted candies right to your countertop without any fuss. The simple ingredients come together in a way that feels both nostalgic and fresh, turning everyday pantry staples into a delightful, shareable confection.
Ingredients You’ll Need
This recipe relies on a handful of ingredients that are easy to find but incredibly important. Each one plays a key role in creating the perfect balance of sweetness, chewiness, and that glossy finish that candy lovers crave. Whether you’re aiming for classic cherry or an exotic tropical twist, these components form the foundation of your sweet success.
- Flavored Jello gelatin (3 oz): This provides the vibrant taste and color, making your candy as joyful to look at as it is to eat.
- Granulated sugar (2 cups): Essential for sweetness and structure, it helps achieve the right candy texture when heated properly.
- Water (¾ cup): Balances the mixture and ensures the sugar dissolves smoothly for a clear, glossy melt.
- Light corn syrup (1 tablespoon): Prevents sugar crystallization and keeps your candy delightfully chewy instead of grainy.
- Citric acid (1 teaspoon, optional): Adds a subtle tangy kick that enhances the flavor complexity when you want a bit of zing.
- Powdered sugar or cornstarch (for dusting): Stops the candies from sticking together after setting and adds a delicate finish.
- Sprinkles (optional): For a fun decorative touch that brings an extra pop of color and festivity.
How to Make Jello Candy Melts: Sweet Treats Made Easy
Step 1: Prepare the Molds
Start by lightly greasing silicone candy molds to keep your candies from sticking, or if you prefer to cut the candy into custom shapes, line a baking sheet with parchment paper. This simple prep step saves a lot of time and frustration later on when it’s time to unmold your creations.
Step 2: Mix the Ingredients
In a medium saucepan, combine your flavored Jello, granulated sugar, water, and light corn syrup. Stir gently over medium heat until all the sugar is fully dissolved. This slow combination ensures even cooking and prevents burning, which is crucial for the perfect melt.
Step 3: Boil the Mixture
Turn your heat up to medium-high and let the mixture reach a lively boil. Attach a candy thermometer and watch closely as your candy reaches 250 degrees Fahrenheit, known as the hard-ball stage. This temperature is the sweet spot for that ideal chewy texture that melts smoothly without being sticky or too hard.
Step 4: Add Citric Acid (Optional)
If you’re craving a bright, tangy twist, stir in the citric acid right when the mixture hits the hard-ball stage temperature. This little addition can transform the candy’s flavor from sweet to perfectly balanced by adding a pleasant sour note that makes every bite extra interesting.
Step 5: Pour into Molds
Carefully pour the hot candy mixture into your prepared molds or spread it evenly over your lined baking sheet if you want thin sheets to cut later. Work quickly because the mixture sets fast once off the heat, and you’ll want clean, smooth edges to show off your colorful creations.
Step 6: Cool and Set
Allow the candy to rest at room temperature until completely firm. Patience here truly pays off; rushing the cooling could cause sticky edges or a gummy texture, but waiting ensures the candy is perfectly set and ready to enjoy.
Step 7: Remove and Dust
Once firm, pop your candies from the molds or carefully cut them into shapes if you used a baking sheet. Lightly dust them with powdered sugar or cornstarch to prevent sticking and to give them a lovely matte finish that’s just begging to be eaten.
Step 8: Decorate (Optional)
For an extra sprinkle of fun, press colorful sprinkles onto the candy surface just before it fully sets. This step is especially delightful for kids or special occasions, adding playful texture and vibrant pops of color to your homemade treats.
How to Serve Jello Candy Melts: Sweet Treats Made Easy
Garnishes
A scatter of sprinkles or a light dusting of powdered sugar can turn your candy melts into an eye-catching snack that’s both playful and elegant. You might also consider edible glitter for parties or small delicate edible flowers for a classy twist.
Side Dishes
These sweet treats pair wonderfully with a simple cup of tea or a cold glass of milk. Their fruity notes can also complement fresh fruit platters or a scoop of sorbet for a refreshing, themed dessert plate.
Creative Ways to Present
Get creative with your presentation by placing your Jello Candy Melts in mini cupcake liners for a bite-sized candy buffet or stacking layered colors in clear jars as charming edible gifts. You can also string them on thin ribbons for a whimsical party decoration that doubles as a candy garland.
Make Ahead and Storage
Storing Leftovers
Keep your Jello Candy Melts in an airtight container at room temperature to maintain their chewy texture and vibrant flavor. Avoid refrigeration, which can introduce moisture and make the candy sticky or harden its texture undesirably.
Freezing
Freezing is not recommended for these candies because the change in temperature and moisture during thawing can ruin their chewy texture and cause them to become grainy or sticky.
Reheating
Reheating is generally unnecessary and not advised since these are best enjoyed fresh or stored as-is. However, if they have hardened over time, a short, gentle warm-up in a low-temperature oven (around 150°F or 65°C) wrapped in foil can soften them slightly—just watch carefully to avoid melting.
FAQs
Can I use any flavor of Jello for this recipe?
Absolutely! The recipe is very versatile, so feel free to experiment with all your favorite gelatin flavors. Just keep in mind that more vivid colors often come with more intense flavors, perfect for playful candies.
What if I don’t have a candy thermometer?
While a candy thermometer is highly recommended for precision, you can test the mixture by dropping a small amount into cold water to check if it reaches the hard-ball stage. The candy should form a firm but pliable ball when you roll it between your fingers.
Is citric acid necessary?
No, citric acid is optional. It adds a tangy note to your candies and intensifies the fruity flavor, but you can omit it if you prefer sweeter, less tart treats.
How long do these candies last?
Stored properly in an airtight container out of direct sunlight, your Jello Candy Melts will stay fresh for up to two weeks, though they’re usually so good they don’t last that long!
Can I add other decorations besides sprinkles?
Definitely! You can try edible glitter, small candy pearls, or even dip them lightly in melted chocolate finished with crushed nuts or coconut flakes for a luxe variation.
Final Thoughts
Making Jello Candy Melts: Sweet Treats Made Easy at home is a wonderful way to bring color, flavor, and joy to your kitchen. Whether as a fun project or a unique gift, these candies offer endless possibilities to customize and enjoy. Give this recipe a try—you’ll be delighted by how simple it is to turn a few everyday ingredients into a batch of vibrant, delicious candies that everyone will love.
PrintJello Candy Melts: Sweet Treats Made Easy Recipe
Jello Candy Melts are colorful, sweet, and easy-to-make treats that combine flavored gelatin and sugar to create delightful homemade candies. Perfect for parties or a fun kitchen project, these melt-in-your-mouth candies can be customized with your favorite Jello flavors and decorated with sprinkles for an extra festive touch.
- Prep Time: 10 minutes
- Cook Time: 15 minutes
- Total Time: 1 hour 30 minutes
- Yield: About 24 small candy pieces 1x
- Category: Candy
- Method: Boiling, Setting
- Cuisine: American
- Diet: Vegetarian
Ingredients
For the Candy Melts:
- 1 package (3 oz) flavored Jello gelatin (any flavor)
- 2 cups granulated sugar
- ¾ cup water
- 1 tablespoon light corn syrup
- 1 teaspoon citric acid (optional, for a tangy flavor)
For Coating and Decoration:
- Powdered sugar or cornstarch (for dusting)
- Sprinkles (optional)
Instructions
- Prepare the Molds: Lightly grease silicone candy molds or line a baking sheet with parchment paper if you plan to cut the candy into pieces later. This helps ensure the candy doesn’t stick when setting.
- Mix the Ingredients: In a medium saucepan, combine the flavored Jello, granulated sugar, water, and light corn syrup. Stir over medium heat until the sugar is completely dissolved to create a smooth mixture.
- Boil the Mixture: Increase heat to medium-high and bring the mixture to a boil. Insert a candy thermometer and continue boiling without stirring until the temperature reaches 250°F (121°C), the hard-ball stage, which guarantees the proper candy texture.
- Add Citric Acid (Optional): If you prefer a tangy flavor, carefully stir in the citric acid once the mixture reaches the desired temperature, blending it well.
- Pour into Molds: Pour the hot candy mixture carefully into the prepared silicone molds or spread it evenly over the lined baking sheet to your desired thickness for cutting later.
- Cool and Set: Let the candy cool completely at room temperature until firm and fully set. This can take about 1 to 2 hours depending on the thickness of the candy.
- Remove and Dust: Remove the candy from molds or cut the set candy on the baking sheet into shapes. Lightly dust the pieces with powdered sugar or cornstarch to prevent sticking.
- Decorate (Optional): Before the candy fully sets, decorate with sprinkles by gently pressing them into the surface to add a fun, colorful finish.
- Serve: Store your Jello Candy Melts in an airtight container at room temperature to maintain freshness, and enjoy these sweet, easy homemade treats!
Notes
- Use a candy thermometer to ensure accuracy when boiling sugar to the right stage.
- If using a baking sheet, spread the mixture evenly to make cutting easier.
- Citric acid is optional but adds a pleasant tartness that balances the sweetness.
- Make sure molds or surfaces are well-greased to avoid sticking.
- Store candies in a cool, dry place to prevent them from becoming sticky or melting.
- Experiment with different Jello flavors for variety and color.
Nutrition
- Serving Size: 2 pieces (approx. 30g)
- Calories: 130 kcal
- Sugar: 28g
- Sodium: 5mg
- Fat: 0g
- Saturated Fat: 0g
- Unsaturated Fat: 0g
- Trans Fat: 0g
- Carbohydrates: 32g
- Fiber: 0g
- Protein: 0g
- Cholesterol: 0mg
Keywords: Jello candy melts, homemade candy, gelatin sweets, easy candy recipe, colorful candy, party treats, sugar candy


