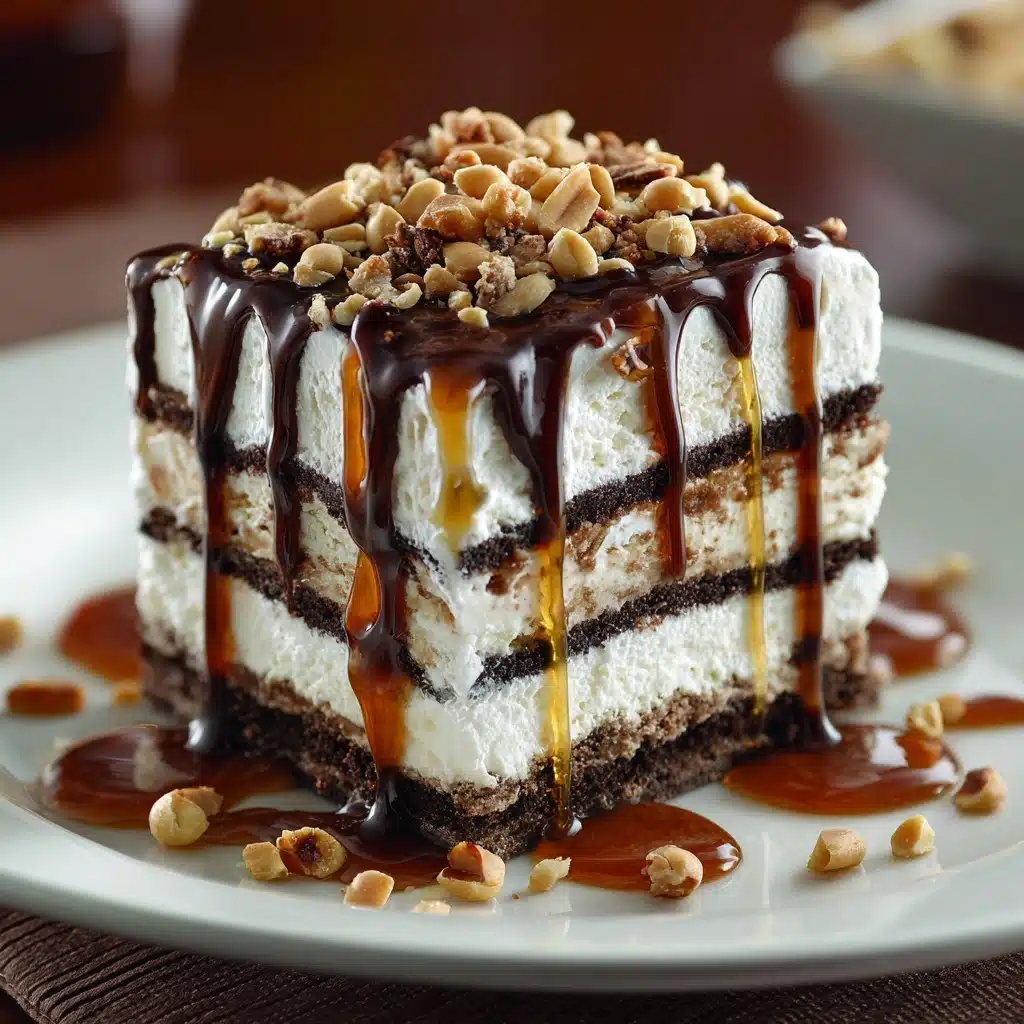
Lazy Ice Cream Sandwich Cake Recipe
Looking for the ultimate make-ahead, crowd-pleasing dessert that’s as easy as it is delightful? The Lazy Ice Cream Sandwich Cake is your new secret weapon! This nostalgic treat layers fluffy whipped topping, gooey fudge and caramel, and crunchy peanuts between cool, creamy ice cream sandwiches. It’s an instant classic that brings out smiles at birthdays, picnics, or after-dinner gatherings. Plus, it’s laughably simple—just assemble, freeze, and let the magic happen.

Ingredients You’ll Need
This recipe is a celebration of simplicity: each ingredient is carefully chosen to maximize both flavor and fun. You won’t need a long shopping list—just a few essentials that, when combined, create a dessert everyone will remember.
- Vanilla Ice Cream Sandwiches: The chilled base of this Lazy Ice Cream Sandwich Cake, these classic treats offer creamy vanilla ice cream and soft chocolate cookies for perfect texture and flavor.
- Whipped Topping (like Cool Whip): For that luxuriously airy layer, whipped topping adds a sweet lightness that holds its shape even when frozen.
- Hot Fudge Ice Cream Topping: Rich, chocolatey fudge sauce is essential for that decadent, molten ribbon running through every bite—warm it slightly for smoother spreading.
- Caramel Ice Cream Topping: Sweet, buttery caramel gives the cake a golden drizzle and balances the chocolate with a touch of salt and depth.
- Roasted Salted Peanuts (optional): Add as a topping for crunch and a salty counterpoint, making the cake pop with flavor and texture.
How to Make Lazy Ice Cream Sandwich Cake
Step 1: Prep Your Pan
Start by lining the bottom of an 8×8-inch pan with a double layer of cling wrap. Let the plastic hang generously over the edges—this makes it a breeze to lift the Lazy Ice Cream Sandwich Cake out later for perfect slices and picture-worthy presentation.
Step 2: Build the First Layer
Neatly arrange about six ice cream sandwiches, side by side, in the bottom of your prepped pan. Don’t worry if there are a few gaps—they’ll disappear once the toppings go on. This layer creates your cake’s foundation, so straighten them out snugly.
Step 3: Add Whipped Topping and Drizzles
Spoon half of the whipped topping over the first layer of sandwiches and smooth it gently with a spatula. Now comes the fun: drizzle a generous (but not gloopy) layer of caramel and fudge sauce over the top—about four tablespoons each, or as your sweet tooth dictates. You can swirl them or layer one on, then the other—there’s no wrong way!
Step 4: Repeat and Decorate the Top
Place the remaining six sandwiches on top of the whipped topping and drizzle layer, pressing them gently so everything stays even. Finish with the rest of the whipped topping, spreading smoothly to the edges. It’s time to play artist: alternate the caramel and fudge in lines across the surface, then drag a toothpick through as you wish for a marbled effect.
Step 5: Freeze and Finish
Pop the pan in the freezer for at least three hours, or until the Lazy Ice Cream Sandwich Cake is firm and set. When ready to serve, lift out using the overhanging plastic and peel it away. For an extra flourish, scatter roasted and salted peanuts on top, and finish with one last playful drizzle of caramel and fudge.
How to Serve Lazy Ice Cream Sandwich Cake
Garnishes
Have fun with garnishes! Try showering the cake with sprinkles for a birthday vibe, or stick to the roasted peanuts for a grown-up twist. A hint of sea salt or a few mini chocolate chips scattered on top adds both texture and a pop of flavor that really makes the Lazy Ice Cream Sandwich Cake shine.
Side Dishes
This dessert truly stands on its own, but if you want to create a dreamy dessert platter, add fresh berries like strawberries or raspberries on the side. A fruit salad balances the richness, and a hot cup of coffee or iced espresso pairs beautifully to round things out.
Creative Ways to Present
Turn serving into a fun event! Cut the cake into squares, then pop each piece on a colorful plate with a scoop of extra whipped topping and a cherry. For parties, slice the Lazy Ice Cream Sandwich Cake into slim bars and skewer with popsicle sticks for a whimsical, ice-cream-truck-inspired look.
Make Ahead and Storage
Storing Leftovers
Got leftovers? Just pop the remaining cake back in the pan, cover tightly with foil or plastic wrap, and return it to the freezer. It keeps beautifully for up to a week—if you can resist sneaking a midnight slice!
Freezing
Since the whole point of this dessert is that it’s freezer-friendly, you can make it days ahead. Just ensure it’s wrapped well to prevent freezer burn and retain the signature creamy texture of the Lazy Ice Cream Sandwich Cake.
Reheating
No heating required (hooray!)—simply remove the cake from the freezer about five minutes before slicing to make cutting easy. If the sauces are extra firm, a hot knife makes perfect, tidy cuts.
FAQs
Can I use different flavors of ice cream sandwiches?
Absolutely! Swap in chocolate, mint, or neapolitan ice cream sandwiches for a playful twist. Every flavor combo adds its own unique character to the Lazy Ice Cream Sandwich Cake.
Is it okay to substitute homemade whipped cream for whipped topping?
Yes, homemade whipped cream works well, though it may freeze a little firmer than store-bought whipped topping. If using homemade, sweeten slightly and whip to stiff peaks before layering.
What can I use instead of peanuts for the topping?
If peanuts aren’t your thing, try chopped toffee, mini chocolate chips, or even pretzel bits for a salty crunch. The garnish is your canvas for creativity!
How far ahead can I make Lazy Ice Cream Sandwich Cake?
For best results, assemble this cake up to three days ahead. Just keep it covered in the freezer, and add garnishes right before serving so they stay crisp and fresh.
How do I get clean slices?
Run a sharp knife under hot water, wipe dry, and slice. Repeat between cuts for picture-perfect squares every time—your Lazy Ice Cream Sandwich Cake will look flawless!
Final Thoughts
If there’s a dessert guaranteed to make you the hero of any gathering, it’s this fun, foolproof Lazy Ice Cream Sandwich Cake. It’s all about maximum flavor with minimum work—so grab your ingredients, bring on the toppings, and get ready for rave reviews. Go ahead and treat yourself (and your friends) to a slice of pure, frosty bliss!
PrintLazy Ice Cream Sandwich Cake Recipe
Indulge in the easiest Lazy Ice Cream Sandwich Cake that requires no baking. Layers of ice cream sandwiches, whipped cream, and caramel and fudge sauce make this a simple and delicious frozen treat.
- Prep Time: 15 minutes
- Cook Time: 0 minutes
- Total Time: 2 hours
- Yield: 8 servings 1x
- Category: Dessert
- Method: Freezing
- Cuisine: American
- Diet: Vegetarian
Ingredients
Ingredients for Lazy Ice Cream Sandwich Cake:
- 12 Vanilla Ice Cream Sandwiches
- 8 oz container of whipped topping (like Cool Whip)
- ½ (15 oz) bottle hot Fudge ice cream topping, warmed
- ½ (15 oz) jar Caramel ice cream topping, warmed
- handful of roasted salted peanuts (optional)
Instructions
- Line the pan: Line the bottom of an 8×8 pan with double cling wrap.
- Layer ice cream sandwiches: Arrange a layer of 6 sandwiches, spread half of the whipped cream, drizzle caramel and fudge sauce.
- Add second layer: Add remaining sandwiches, top with whipped cream, drizzle with caramel and fudge sauce, create a design with a toothpick.
- Freeze: Freeze until set. Add peanuts, more sauce before serving.
Nutrition
- Serving Size: 1 slice
- Calories: 320
- Sugar: 20g
- Sodium: 260mg
- Fat: 16g
- Saturated Fat: 8g
- Unsaturated Fat: 6g
- Trans Fat: 0g
- Carbohydrates: 40g
- Fiber: 1g
- Protein: 3g
- Cholesterol: 15mg
Keywords: Ice Cream Sandwich Cake, Frozen Dessert, Easy Dessert Recipe


