Raising Cane’s Chicken Tenders Recipe
Introduction
Raising Cane’s Chicken Tenders are crispy, tender, and full of flavor, perfect for a satisfying homemade meal. This recipe guides you through marinating and breading the chicken for that signature crunchy coating everyone loves.
Ingredients
- 2 pounds chicken tenders (tendons removed)
- 5-6 cups vegetable oil (for frying)
- 2 cups buttermilk
- 2 teaspoons salt (for marinade)
- 1 teaspoon ground black pepper (for marinade)
- 1 teaspoon onion powder (for marinade)
- ½ teaspoon garlic powder (for marinade)
- ½ teaspoon paprika (for marinade)
- 2 ¼ cups all-purpose flour
- ¾ cup cornstarch
- 1 ½ teaspoon salt (for breading)
- ½ teaspoon ground black pepper (for breading)
- 1 teaspoon onion powder (for breading)
- 1 teaspoon garlic powder (for breading)
- ½ teaspoon paprika (for breading)
Instructions
- Step 1: Trim the chicken tenders by removing the tendons and place them in a large bowl.
- Step 2: Prepare the marinade by adding buttermilk, salt, black pepper, onion powder, garlic powder, and paprika to the bowl with the chicken. Toss to coat thoroughly.
- Step 3: Cover and refrigerate the chicken for at least 4 hours, or up to 24 hours for the best flavor and tenderness.
- Step 4: When ready to cook, heat vegetable oil in a large, deep pot until it reaches 350°F, about 2 inches deep.
- Step 5: In a separate large bowl, mix together the flour, cornstarch, salt, black pepper, onion powder, garlic powder, and paprika to create the breading.
- Step 6: Remove each chicken tender from the marinade, allowing excess to drip off, then coat fully in the breading mixture.
- Step 7: For an extra crispy coating, dip the breaded chicken back into the marinade and then again into the breading, pressing it firmly to adhere.
- Step 8: Fry the tenders in batches for 5-7 minutes, turning halfway through, until golden brown and the internal temperature reaches 165°F.
- Step 9: Transfer cooked tenders to a wire rack or paper towel-lined pan to drain excess oil.
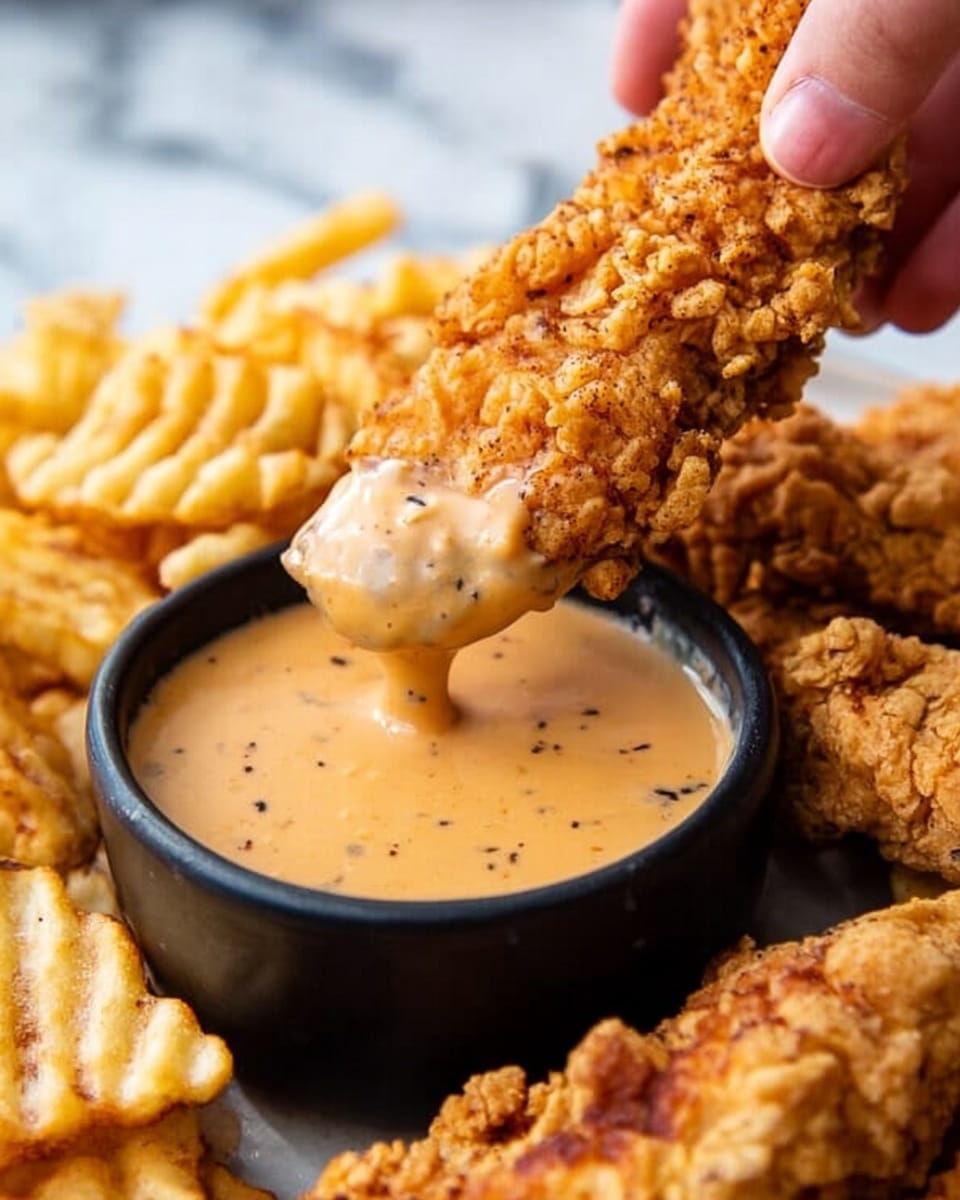
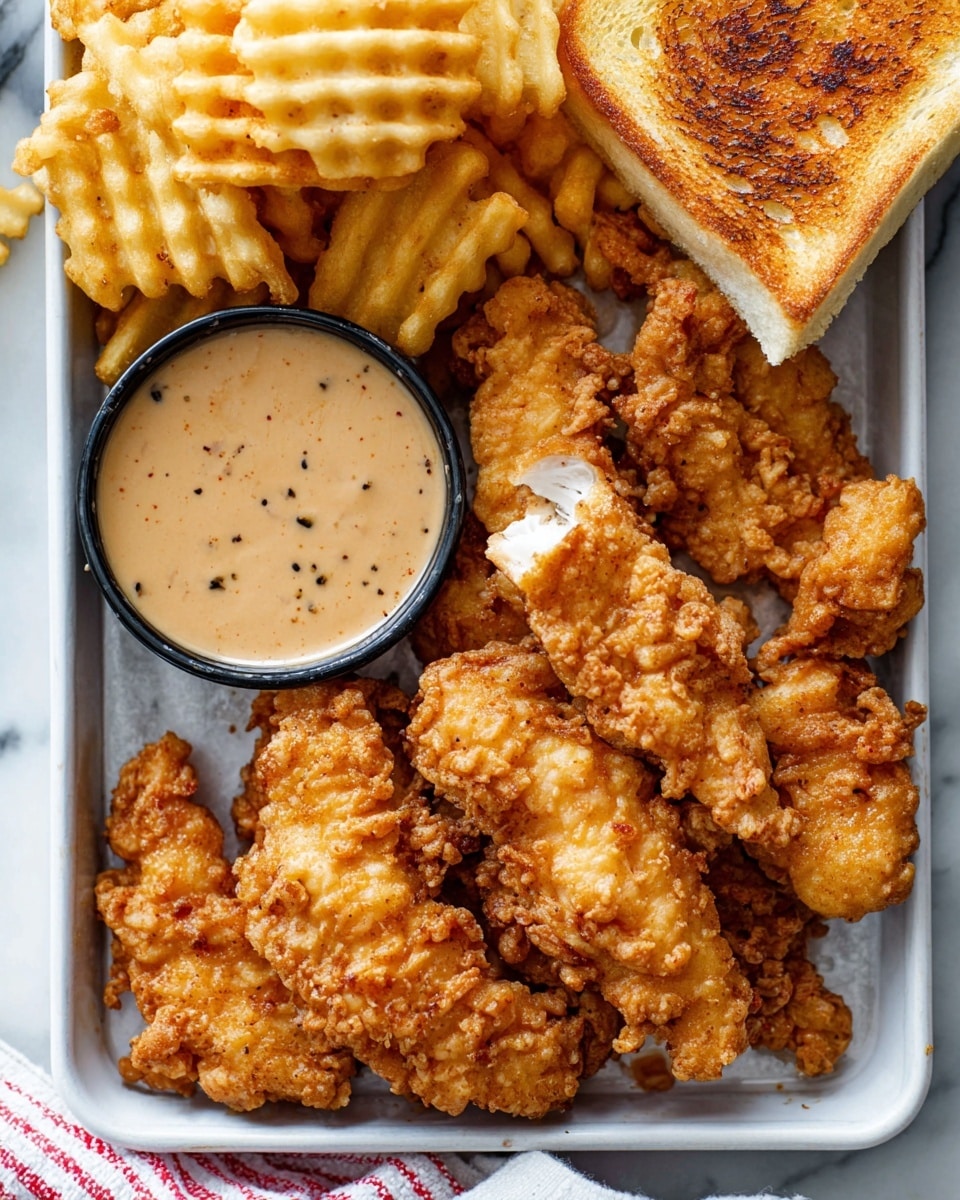
- Step 10: Serve immediately with crinkle-cut fries and your favorite dipping sauce, like homemade Cane’s Sauce.
Tips & Variations
- Use a thermometer to maintain oil temperature for evenly cooked, crispy tenders.
- Double breading helps create a thicker, flaky crust that stays crispy longer.
- For a spicy twist, add cayenne pepper or hot sauce to the marinade or breading mix.
- Marinating overnight enhances flavor and juiciness but avoid exceeding 24 hours to prevent texture issues.
Storage
Store leftover chicken tenders in an airtight container in the refrigerator for up to 3 days. Reheat in a 375°F oven on a wire rack for 10-12 minutes to restore crispiness. Avoid microwaving to keep the coating crunchy.
How to Serve
Serve this delicious recipe with your favorite sides.
FAQs
Can I use regular milk instead of buttermilk?
Regular milk can be used in a pinch, but buttermilk’s acidity helps tenderize the chicken and improves the flavor and texture of the coating.
Is it necessary to double coat the chicken?
Double coating creates a thicker, flakier crust that holds up better during frying and keeps the tenders extra crispy.
PrintRaising Cane’s Chicken Tenders Recipe

This recipe for Raising Cane’s Chicken Tenders features tender, juicy chicken strips marinated in a flavorful buttermilk mixture, then double-breaded and fried to golden perfection. The secret to their signature crispy coating lies in the double breading technique combined with a blend of spices in both the marinade and breading mix. Perfectly paired with crinkle-cut fries and Cane’s Sauce, these chicken tenders make a delicious meal that captures the iconic taste of the popular fast-food favorite right at home.
- Prep Time: 15 minutes
- Cook Time: 20 minutes
- Total Time: 4 hours 35 minutes
- Yield: 6 servings 1x
- Category: Main Course
- Method: Frying
- Cuisine: American
Ingredients
Chicken and Marinade
- 2 pounds chicken tenders (tendons removed)
- 2 cups buttermilk
- 2 teaspoons salt
- 1 teaspoon ground black pepper
- 1 teaspoon onion powder
- ½ teaspoon garlic powder
- ½ teaspoon paprika
Frying
- 5–6 cups vegetable oil (for frying)
Breading
- 2 ¼ cups all-purpose flour
- ¾ cup cornstarch
- 1 ½ teaspoon salt
- ½ teaspoon ground black pepper
- 1 teaspoon onion powder
- 1 teaspoon garlic powder
- ½ teaspoon paprika
Instructions
- Trim Chicken: Remove the tendons from the 2 pounds of chicken tenders, then place the chicken in a large mixing bowl ready for marination.
- Prepare Marinade: Add 2 cups of buttermilk, 2 teaspoons salt, 1 teaspoon ground black pepper, 1 teaspoon onion powder, ½ teaspoon garlic powder, and ½ teaspoon paprika to the chicken bowl.
- Marinate Chicken: Toss the chicken thoroughly in the marinade until all pieces are fully coated. Cover and refrigerate for at least 4 hours or up to 24 hours to allow flavors to develop and chicken to tenderize.
- Heat Oil: When ready to cook, pour 5-6 cups of vegetable oil into a large deep pot, filling to a depth of about 2 inches. Heat the oil over high heat until it reaches 350°F (175°C).
- Prepare Breading Mix: In a separate large bowl, combine 2 ¼ cups all-purpose flour, ¾ cup cornstarch, 1 ½ teaspoon salt, ½ teaspoon ground black pepper, 1 teaspoon onion powder, 1 teaspoon garlic powder, and ½ teaspoon paprika. Mix well.
- Bread the Chicken: Remove chicken tenders from the marinade one at a time, letting excess marinade drip off. Dredge each piece thoroughly in the breading mixture, pressing the coating firmly onto the chicken. Dip the chicken back into the marinade and then into the breading mixture again to achieve a double breading for extra crispiness.
- Fry Chicken: Carefully place the breaded chicken tenders in batches into the hot oil. Fry for 5-7 minutes, flipping halfway through, until the chicken reaches an internal temperature of 165°F (74°C) and the coating is golden and crispy.
- Drain and Serve: Remove fried chicken tenders with a slotted spoon and transfer them to a wire rack or a baking pan lined with paper towels to drain excess oil. Serve immediately with crinkle-cut fries and homemade Cane’s Sauce.
Notes
- Double breading the chicken tenders increases the crunchiness of the coating.
- Use a thermometer to maintain oil temperature at 350°F to ensure even cooking without oil absorption.
- Marinating for a full 24 hours yields the best flavor and tenderness, but 4 hours is sufficient in a pinch.
- Ensure chicken reaches 165°F internally to guarantee safe consumption.
- Drain chicken on a wire rack rather than paper towels if you want to keep the crust crispier.
Keywords: Raising Cane’s chicken tenders, crispy chicken tenders, buttermilk fried chicken, Southern fried chicken, double breaded chicken, homemade chicken tenders

