Vanilla Wafers Recipe
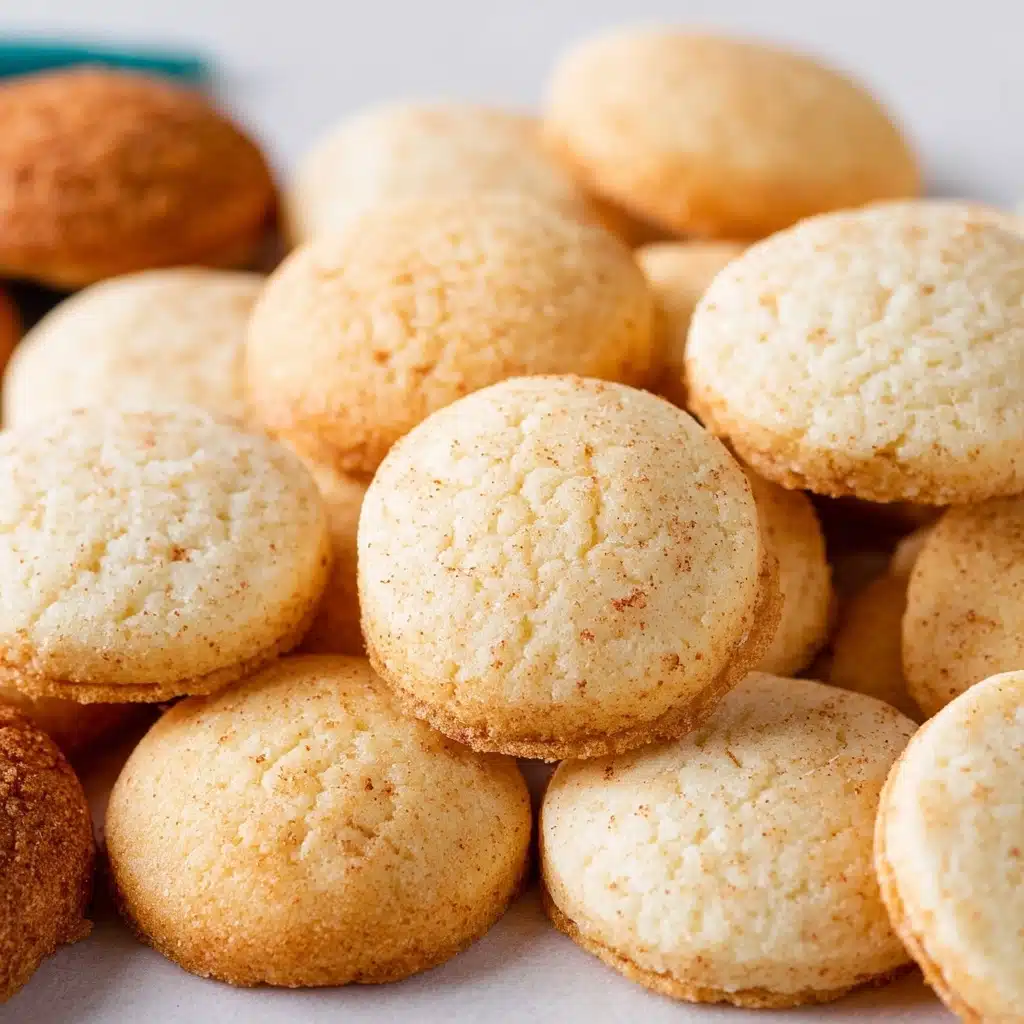
If you’re searching for a classic treat that’s both irresistibly buttery and wonderfully crisp, these Vanilla Wafers are exactly what you need to bake up some joy. With a rich vanilla aroma and a delicate crunch, these little cookies melt in your mouth and bring a nostalgic comfort to any snack time. Whether you are enjoying them with tea, adding them to a creamy dessert, or simply nibbling them by the handful, Vanilla Wafers are a timeless favorite that never fail to brighten up your day.
Ingredients You’ll Need
Gathering simple, essential ingredients is the first step towards crafting perfect Vanilla Wafers. Each element plays a crucial role, from the creamy texture contributed by the butter to the subtle sweetness and warm vanilla notes that define these cookies.
- Unsalted butter (½ cup, 113 g): Provides a rich, creamy base that ensures your wafers are tender.
- Granulated sugar (⅔ cup, 133 g): Adds just the right amount of sweetness and helps create that crisp cookie texture.
- Large egg: Binds the ingredients together while adding a slight lift for a delicate crumb.
- Vanilla extract (4 teaspoons): Infuses the dough with the unmistakable, warm vanilla flavor that defines these wafers.
- All-purpose flour (1 ½ cups, 190 g): Forms the sturdy yet tender structure of each cookie.
- Baking powder (¾ teaspoons): A subtle leavening agent that gives your wafers a light touch of puffiness.
- Salt (½ teaspoon): Enhances the overall flavor by balancing the sweetness.
- Milk (1 tablespoon): Adds just the right moisture to bring the dough together smoothly.
How to Make Vanilla Wafers
Step 1: Preheat and Prepare
Start by preheating your oven to 350°F (175°C) and lining a baking sheet with parchment paper. This simple prep step ensures your wafers will bake evenly and won’t stick, making for easy removal once they’re golden perfection.
Step 2: Cream Butter and Sugar
In a mixing bowl, combine the softened unsalted butter with granulated sugar. Using an electric mixer, beat them together until the mixture turns creamy and well-combined. This step is essential as it incorporates air, giving your wafers their delicate texture.
Step 3: Add Egg and Vanilla
Next, add the egg along with the vanilla extract to your creamed butter and sugar mixture. Beat on medium-low speed until everything is fully blended, creating a rich and fragrant base for your cookie dough.
Step 4: Combine Dry Ingredients
In a separate bowl, whisk together the all-purpose flour, baking powder, and salt. This evenly distributes the leavening and seasoning to ensure consistent flavor and texture throughout your wafers.
Step 5: Mix Flour and Milk into Dough
Gradually add half of the dry flour mixture to the wet ingredients, stirring on low speed until combined. Then pour in the tablespoon of milk and stir again. Finally, add the remaining flour mixture and mix until just combined—don’t overmix, or the wafers may become tough.
Step 6: Shape and Bake
Use a two-teaspoon cookie scoop to portion out the dough into even mounds on your prepared baking sheet, spacing them at least 2 inches (5 cm) apart. Lightly flatten each scoop with damp fingertips to encourage that classic wafer shape. Bake in your preheated oven for 12-14 minutes, or until the edges turn a delicate light golden brown.
Step 7: Cool and Enjoy
Allow your Vanilla Wafers to cool on the baking sheet for about 5-10 minutes before transferring them to a wire rack to cool completely. This step helps them set and maintain their crispness, making each bite simply irresistible.
How to Serve Vanilla Wafers

Garnishes
Enhance your Vanilla Wafers by pairing them with a dusting of powdered sugar or a drizzle of melted white chocolate. Fresh berries or thin slices of ripe peaches also make delightful garnishes that balance the sweetness with a touch of natural freshness.
Side Dishes
Vanilla Wafers are a dream accomplice to creamy desserts like banana pudding, chocolate mousse, or ice cream sundaes. Their crunch creates a satisfying contrast to smooth textures and adds layers of flavor when layered in trifles or parfaits.
Creative Ways to Present
Surprise your guests by stacking Vanilla Wafers with whipped cream and fruit to form small towers or use them as a base for bite-sized cheesecake cups. Another fun idea is to sandwich them with jam or lemon curd for a delightful handheld treat that’s both elegant and easy to enjoy.
Make Ahead and Storage
Storing Leftovers
If you find yourself with extra Vanilla Wafers, store them in an airtight container at room temperature. They will stay fresh and crisp for up to a week, perfect for snacking or adding to your favorite desserts later on.
Freezing
You can freeze Vanilla Wafers by placing them in a sealed freezer bag or container. When properly wrapped, they maintain their flavor and texture for up to two months, making it easy to enjoy freshly baked wafers anytime you like.
Reheating
To enjoy your wafers warm, simply place them on a baking sheet and warm in a preheated oven at 300°F (150°C) for 3 to 5 minutes. This revives their crispiness and brings back that lovely fresh-baked aroma.
FAQs
Can I use salted butter instead of unsalted?
While unsalted butter is preferred for control over salt levels, using salted butter is fine if that’s what you have—just reduce or omit the added salt in the recipe to avoid making the wafers too salty.
How do Vanilla Wafers differ from sugar cookies?
Vanilla Wafers have a crisper texture and a stronger vanilla flavor. They are smaller and thinner than typical sugar cookies, which are usually softer and chewier.
Can I substitute the milk with a non-dairy alternative?
Absolutely! Almond, soy, or oat milk work nicely as dairy-free alternatives and will not alter the cookie’s texture significantly.
What’s the best way to flatten the cookie dough?
Using damp fingers to gently press each dough mound helps prevent sticking and shapes the wafers evenly without cracking the dough.
Are Vanilla Wafers suitable for decorating?
Yes, their firm structure holds up well to light decoration like icing or edible glitter, making them perfect for festive occasions or personalized gifts.
Final Thoughts
There’s something truly special about homemade Vanilla Wafers—their buttery, vanilla-filled simplicity feels like a warm hug wrapped in a cookie. I hope you give this recipe a try and find as much joy in baking and savoring them as I do. Once you taste these, you’ll never want store-bought wafers again!
PrintVanilla Wafers Recipe
Delightfully crisp and buttery Vanilla Wafers made from scratch with simple ingredients. These classic cookies feature a delicate vanilla flavor and a melt-in-your-mouth texture, perfect for snacking or pairing with your favorite desserts.
- Prep Time: 10 minutes
- Cook Time: 14 minutes
- Total Time: 24 minutes
- Yield: Approximately 24 cookies 1x
- Category: Cookies
- Method: Baking
- Cuisine: American
- Diet: Vegetarian
Ingredients
Wet Ingredients
- ½ cup (113 g) unsalted butter, softened
- 1 large egg, room temperature preferred
- 4 teaspoons vanilla extract
- 1 Tablespoon milk
Dry Ingredients
- ⅔ cup (133 g) granulated sugar
- 1 ½ cups (190 g) all-purpose flour
- ¾ teaspoon baking powder
- ½ teaspoon salt
Instructions
- Preheat Oven: Preheat your oven to 350°F (175°C) and line a baking sheet with parchment paper to prevent sticking. Set aside while preparing the dough.
- Cream Butter and Sugar: In a mixing bowl, combine the softened butter and granulated sugar. Using an electric mixer, beat on medium speed until the mixture becomes creamy and well combined, creating a smooth base for the cookies.
- Add Egg and Vanilla: Add the egg and vanilla extract to the butter and sugar mixture. Stir on medium-low speed until fully incorporated, ensuring a rich and flavorful dough.
- Mix Dry Ingredients: In a separate bowl, whisk together the all-purpose flour, baking powder, and salt. This ensures the leavening agent and seasoning are evenly distributed throughout the dough.
- Combine Half Dry Ingredients: Add about half of the dry ingredient mixture to the wet ingredients. Stir on low speed just until combined to avoid overmixing which can toughen the cookies.
- Add Milk: Pour in the tablespoon of milk and stir again on low speed. This adds moisture, helping achieve the soft yet crisp texture of the wafers.
- Add Remaining Dry Ingredients: Add the remaining flour mixture and stir until the dough is fully combined and smooth, ready for scooping.
- Scoop and Shape: Using a 2-teaspoon cookie scoop, portion out dough onto the prepared baking sheet. Space each cookie at least 2 inches (5 cm) apart to allow for spreading. Lightly flatten each scoop with damp fingertips for an even shape.
- Bake: Bake in the preheated oven for 12 to 14 minutes or until the edges of the cookies turn a light golden brown, indicating they are perfectly baked.
- Cool: Let the cookies cool on the baking sheet for 5 to 10 minutes to set before transferring them to a wire rack to cool completely. Enjoy your homemade vanilla wafers!
Notes
- Room temperature egg helps the ingredients blend better, resulting in a smoother dough.
- If you don’t have milk on hand, you can substitute with an equal amount of cream or a plant-based milk.
- For extra flavor, consider adding a pinch of cinnamon or a little almond extract along with the vanilla.
- To keep cookies crisp, store them in an airtight container at room temperature for up to one week.
- You can freeze the dough scoops before baking for up to 3 months; just add a couple of extra minutes to bake time if baking from frozen.
Nutrition
- Serving Size: 1 cookie (approx. 12 g)
- Calories: 70
- Sugar: 5 g
- Sodium: 55 mg
- Fat: 4 g
- Saturated Fat: 2.5 g
- Unsaturated Fat: 1 g
- Trans Fat: 0 g
- Carbohydrates: 8 g
- Fiber: 0.2 g
- Protein: 1 g
- Cholesterol: 15 mg
Keywords: Vanilla Wafers, homemade cookies, buttery cookies, classic cookie recipe, vanilla cookies, easy cookie recipe
